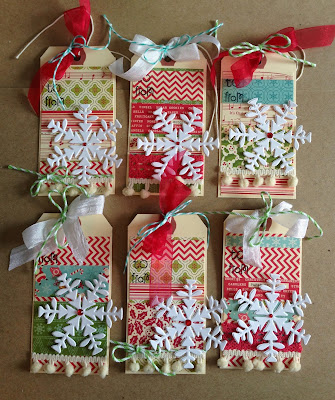
How about dressing up some plain old shipping tags to make some Christmas tags? That's what I have to share with you today... Christmas tags made using a Cuttlebug snowflake die, papers from October Afternoon, stamps from Paper Smooches, twine from The Twinery, and gems, trims and ribbons from local craft stores.
Thanks so much for stopping by. I hope you're having a great day. Happy Stamping!
Showing posts with label Cuttlebug. Show all posts
Showing posts with label Cuttlebug. Show all posts
Saturday, November 30, 2013
Thursday, May 17, 2012
Graduation Case
Today's cards were cased from some great grad cards that Debbie Olson posted on her blog last year. I didn't have the PTI Alpha Blocks set that she used so I pulled out my 1 inch punch and punched out some black cardstock then I used my Olivia cuttlebug dies to make the white cardstock numbers and adhered them to the black squares.
I had so much fun with the design that I put together a couple of cards. I should be set now for the graduation season. :)
Thanks so much for stopping by. I hope you have a terrific Thursday. Happy Stamping!
I had so much fun with the design that I put together a couple of cards. I should be set now for the graduation season. :)
Thanks so much for stopping by. I hope you have a terrific Thursday. Happy Stamping!
Sunday, November 20, 2011
Banner Day with Twine and Coffee Filters
Today I have a banner to share. I thought it would be fun to make a snowflake banner so I pulled out some coffee, coffee filters, charcoal twine from The Twinery, a snowflake stamp, white acrylic paint, cuttlebug snowflake die and embossing folder, buttons and gemstones. I knew I wanted a homespun look for my banner so I brewed up some coffee and soaked the coffee filters and twine in the coffee to give them a nice aged look.
Once the filters and twine were dry I folded the filters in half and glued the twine around the edges. Next I stampted some snowflakes with white acrylic paint and die cut and embossed some snowflakes. The snowflakes each got a button center and were attached to the banner with a glue dot. For the finishing touch I added some red gemstones (clear colored with a red Copic) to the center of the stamped snowflakes.
I really like the aged look of the twine and coffee filters from soaking them in the coffee. It really makes the white snowflakes pop.
For now the banner is hanging in my stamp studio but I think it will be moved to the piano after Thanksgiving.
Thanks so much for stopping. I hope you're having a banner day! Sorry, I couldn't resist.
Monday, November 14, 2011
Another Milestone Birthday
How about a card celebrating a 40th birthday for today? Again, I didn't make it with anyone particular in mind, I'm actually planning to list it in my Etsy store. It's very similar to yesterday's card but I went with a black card base and used My Mind's Eye Home paper for some color. The numbers are from the Cuttlebug Olivia set. The number background from the Glitz Distressing stamp set is stamped in A Muse Studio Wheat ink. The sentiment strip edges are inked with some Vintage Photo Distress ink and the sentiment is stamped in SU Basic Gray ink. The sentiment is from the PTI Big & Bold Wishes stamp set. Instead of using twine on the tag, I used some custom dyed ribbon
Thanks so much for stopping. I hope you're having a great day!
Sunday, November 13, 2011
A Milestone Birthday
It's always fun to have a special card for a milestone birthday. Today I have a card celebrating a 30th birthday. I didn't make it with anyone particular in mind, I'm actually planning to list it in my Etsy store. The card base is SU Not Quite Navy with a PTI Rustic Cream mat that I stamped with the number background from the Glitz Distressing stamp set in A Muse Studio burmuda ink. The sentiment strip edges are inked with some Vintage Photo Distress ink and the sentiment is stamped in A Muse Studio Navy ink. The sentiment is from the PTI Big & Bold Wishes stamp set. The floral piece is a journaling card from October Afternoon's Detours line. The tag and numbers are from the Cuttlebug Red Tag Sale set. I also added a circle punch of October Afternoon Freshly Mown Lawn paper from the Daydreams line and a rustic cream circle die cut with Spellbinders Nestabilities Large Pinking Circles. For the finishing touch on the tag I tied some twine from The Twinery on the top (honeydew, caribbean, peapod).
Thanks so much for stopping. I hope you're having a great day!
Labels:
Cuttlebug,
Glitz Designs,
October Afternoon,
Papertrey,
The Twinery
Subscribe to:
Posts (Atom)


