Wednesday, November 26, 2008

Season's Greetings

This card is for the Sketch Challenge from 11/15/08 on Paper Craft Planet.

The base is Kraft with a layer of Chocolate Chip. The snowflakes on the choc chip layer were stamped in Distress ink (walnut stain) and then the edges were sponged. For the next layer I used the long scallop rectangle Nestabilities with Kraft. The dots are stamped in Distress inks (fired brick, peeled paint) and then more snowflakes. The greeting panel is stamped with peeled paint and layerd onto Riding Hood Red. For the snowflake I punched choc chip cardstock and covered it with a lite layer of Glossy Accents and then dipped it in Diamond Dust. After the snowflake dried I added the button and attached it to the card.
Supplies:
  • Stamps - Rubbernecker (snowflakes), Inky Antics (greeting), Victorine Originals (dots)
  • Ink - Distress Inks (peeled paint, fired brick, walnut stain, vintage photo)
  • Paper - SU Kraft, Chocolate Chip, Riding Hood Red
  • Misc -Button, Tracing Wheel, Snowflake punch, Glossy Accents, Diamond Dust

Tuesday, November 25, 2008

It's a Girl

Some friends had a baby girl last week and this is the card I sent to them. The card base is textured pink pirouette. The designer papers are from the DCWV Nanna's Nursery line. The white is some textured paper I got at the local stamp store. The booties (stamp unmarked) are stamped in pink pirouette. I added the scalloped border and some lace and finally the prima flower and button. The image panel is mounted with pop dots.


Supplies:
  • Stamps - Bootie Stamp unmarked, It's a Girl retired SU hostess set
  • Ink - SU Pink Pirouette
  • Paper - SU Pink Pirouette, White (unknown), DCWV
  • Misc -Prima, Button, Lace, Scallop punch, Tracing Wheel

Monday, November 24, 2008

Another Anniversary

I know this card is basically the same as the last post but I wanted to show you the wonderful idea I got from Kim Hughes. Check out this post on her blog for her sample. Cut a strip of Co'ordinations cardstock and run it through your Dymo label maker then lightly sand the letters. I think this is an idea that will get a lot of use!

Otherwise the supplies and details of the card are basically the same as the previous post.


Thanks for stopping!

Marching to his own beat

Are any of you fans of The Amazing Race? I just love that show and last night had me in tears with laughter. In the previews for the show I saw some VERY HUMOUROUS marching going on and I thought it was just one of the contestants having fun but that was really his attempt at marching. Here's a clip from the show -


Now is that entertaining or what?! You gotta love those boys.


Ok, back to stamping. I needed some anniversary cards so I pulled out the K & Co Ancestry papers that I bought at Gina K's store and the Kim Hughes Silhouette Blooms I set from Cornish Heritage Farms.

The flower was stamped in SU Soft Sky on Very Vanilla then the edges were lightly sponged with Walnut Stain Distress Ink. The Walnut Stain was also used to stamp the Happy Anniversary from Stampendous and ink the edges of the tag.


Thanks so much for stopping by. I hope you're all having a wonderful day!

Supplies:
  • Stamps - Cornish Heritage Farms Silhouette Blooms I from the Kim Hughes Collection
  • Ink - Distress ink walnut stain, SU Soft Sky
  • Paper - SU Kraft, Very Vanilla, K&Co Ancestry
  • Misc -Button, Twine, Tracing Wheel

Friday, November 21, 2008

Punny Farm

It's cold again here today but the sky is blue and the sun is shining so all things considered it's a good day!

I was making some computer generated sayings the other day and this is one that I did. I thought it would be so fun to make a little farm scene so I stamped the cow from SU's Very Punny set three times with Ranger Archival ink on Very Vanilla cardstock then colored them with Copics and cut them out. I used my Nestabilities Label 1 set to cut out the label then sponged it with Peeled paint distress ink and SU Soft Sky. I used a copic multiliner to draw the little barn and silo and colored them with copics then sponged the edges of the label with Vintage photo distress ink. The cows were mounted with pop dots for some dimension.

Supplies:

  • Stamps - SU Very Punny
  • Ink - Ranger Archival, Distress inks (peeled paint, vintage photo), SU Soft Sky
  • Paper - SU Old Olive, Very Vanilla, Red, My Mind's Eye
  • Misc - Nestabilities, SU Curly Label Punch, Pop dots, Copic multiliner, Copics

Thursday, November 20, 2008

Bats about you

I know Halloween is over but I wanted to make a card for my hubby the other night and when I saw the bat stamp sitting there on the shelf I had this idea.

The bats are stamped on mustard cardstock and heat embossed in black. Then I cut them out and mounted them with pop dots. The card base is mustard with a layer of black, then a layer of Basic Grey dp and a circle of My Mind's Eye dp. I added some dots around the circle with a copic multiliner. All of the edges of the dp papers were sponged with vintage photo distress ink. Finally I used my Dymo label maker for the tag.

Just a simple card to let my hubby know that I was thinking about him while I was in my craftroom and he was working late.
Supplies:
  • Stamps - Inkadinkado
  • Ink - Distress inks (black, vintage photo)
  • Paper - SU Mustard, Black, DP (Basic Grey and My Mind's Eye)
  • Misc - Black EP, Nestabilities, Pop dots, Copic multiliner, Dymo label maker

Wednesday, November 19, 2008

Birthday Chick

I hope you aren't sick of cards with the Party Farm Animals from Pink Cat Studio. I know I've already shared a couple of them in the last week or so but it's such a fun set to use. When I saw this sentiment recently I knew I had to use it with these chicks. Don't you think the little chicks in their party hats are perfect!?!?

I computer generated the sentiment using the King Cool font. All of the hats have stickles on them for some added sparkle. Next I pulled out the gem stones and added them to the scalloped circle. The chicks and piggy were colored with copics and the background was colored with my aqua brush and watercolor wonder crayons. The scallop circle and line of chicks are all mounted with pop dots for some dimension.
For those that are interested, I'm hoping to have the directions for the magnet set boxes ready for sharing soon so please stop back. I hope you're all having a great day! Thanks so much for stopping by.

Supplies:
  • Stamps - Pink Cat Studio Party Farm Animals
  • Ink - Archival Black
  • Paper - SU Kiwi Kiss, Choc Chip, Cool Caribbean, White, Designer paper (unknown)
  • Misc - Copics, Watercolor Wonder Crayons, Punches, Nestabilities, Gems, Stickles, Pop dots

Tuesday, November 18, 2008

Bring on the cupcakes

Did you see Julia Stainton's Sweetie Pie card? It inspired me to make this cupcake card. I stamped the cupcakes on SU Very Vanilla with Archival ink and colored them with Copics. Next I ran some Cosmo Cricket paper through my cuttlebug with my new Nesties (Labels 1). I mounted the cupcakes to the label with pop dots and then added glossy accents to the frosting portion of the cupcakes and sprinkled them with glitter.

Next I made a vanilla card base and added some layers of Cosmo Cricket papers with a strip of SU designer paper. I added a strip of lace that I found at a garage sale this summer and used my Dymo label maker (also found at a garage sale) to make the tag.

I always get a little sad when rummage sale season comes to an end but I think it helps me appreciate it more when spring rolls around and it's time to go bargain hunting again. The temperature is 12 right now so it's definitely not rummage sale weather. The high for today is only 31 but on the up side, the ground is frozen enough that the dogs aren't muddy every time they go outside. Yeah!

Supplies:
  • Stamp - Baked with Love by Kim Hughes from Cornish Heritage Farms
  • Ink - Archival
  • Paper - SU Vanilla, DP pack (hostess), Cosmo Cricket
  • Misc - Nesties, Lace, Glitter, Glossy accents, Pop dots, Dymo label maker

Monday, November 17, 2008

Serenity

I was looking at the Hero Arts Blog the other day was inspired to pull out my distress inks and make some background papers. I love the Serenity stamp from Artistic Outpost paired with this type of background.

I layed Ranger Distress inks (shabby shutters, old paper, vintage photo) on my craft sheet, spritzed them with water and dragged the paper through the ink to create the background. More details on the technique are available on this post. After I inked the serenity stamp with Walnut Stain Distress Ink I ran my brayer over it to even out the ink before stamping the image.

Supplies:
  • Stamps - Serenity from Artistic Outpost
  • Ink - Distress Inks Vintage Photo, Aged Paper, Peeled Paint, Walnut Stain
  • Paper - SU Vanilla, Choc Chip, Old Olive, Striped DP
  • Misc - Prima, Button, Hemp

Saturday, November 15, 2008

Simple Saturday

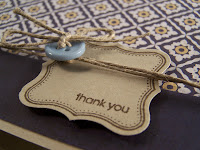
I needed a quick thank you card so I put together this simple card. The base is Kraft with some layers of Basic Grey Granola. I stamped the thank you from the SU Cute and Curly set with Walnut Stain Distress ink on a scrap of Kraft and punched it out using the matching Curly label punch. I mounted the punch with pop dots and then wrapped twine around the card a couple of times and finished it off with a button. I really like the way it turned out and might use the design for making some gift packs to have on hand.

On a different note, we've entered the mud season here in Minnesota. For the last several days we've been having a rain/snow mixture and it's really getting old. I don't mind the rain or the snow so much except when it comes to muddy dogs! Bathing the dogs every day is a little tiresome. Thankfully they are really good about getting bathed but I'm looking forward to colder weather so the ground freezes and no more mud for months!

Hope you're having a great weekend! Thanks so much for stopping by!

Supplies:
  • Stamp - SU Cute & Curly (from the CurlyLabel Punch Bundle)
  • Ink - Distress Ink Walnut Stain
  • Paper - SU Kraft, Basic Grey Ganola
  • Misc - SU Curly Label Punch, Twine, Button, Pop dots

Friday, November 14, 2008

Magnet Sets

I recently participated in a craft show with my friend Rachel Hart of Apron Elegance and Gift an Apron.com. She sews the most amazingly detailed and fun hostess aprons in addition to functional aprons. Her media aprons are so cute with the little vinyl pocket for your cell phone or iPod. Check them out.

Now, on to my magnets. I wanted to create something more than just cards to sell at the craft show so I made up some magnet sets.

Check out Tim Holtz's blog for the directions on how to create these using Tim Holtz Fragments, Glossy Accents and some patterned paper or stamped images.

This set uses the Basic Grey Urban Prairie papers. For packaging I wanted something to stick the magnets to so they didn't just flop around so I went to Home Depot and bought some flat metal brackets. To make them look presentable I sewed a muslin cover over the bracket and trimmed the edges with pinking shears. Finally I created a little box for the muslin covered bracket to fit in and covered it with matching paper. Here's a photo of the set with the matching box.

One of my co-workers saw them and asked for 8 sets so I'd better get to work. They are pretty fun to put together. The Fragments and Glossy Accents are available at Rubbernecker. I purchased the magnets at Michael's. If you're interested in a pattern for the box, leave me a comment and I'll put one together.

Have a great weekend! Thanks for stopping by.

Thursday, November 13, 2008

Party Animals

More fun today with the Party Farm Animals set from Pink Cat Studio. I used an older sketch challenge from Splitcoast for my layout (SC186). I stamped the image on white and colored it with Copics, then sponged the edges with Aged Paper distress ink. The designer papers are from the Basic Grey Urban Prairie 12x12 pack. The Happy Birthday circle is mounted with pop dots for some dimension. I also found some vintage rick rack in my stash that matched the blue on the Basic Grey paper perfectly.

Supplies:
  • Stamps - Pink Cat Studio Party Farm Animals
  • Ink - Archival Black, Distress Ink Aged Paper
  • Paper - SU Kraft, Black, Riding Hood Red, White, Basic Grey Urban Prairie
  • Misc - Copics, Rick rack, Staples, Nestabilities

Wednesday, November 12, 2008

Farm Animals

For today's card I pulled out my Party Farm Animals set from Pink Cat Studio. I stamped the image on white and colored it with reinkers, then sponged the edges with Aged Paper distress ink. The designer papers are from the Basic Grey Urban Prairie 12x12 pack. I had a hard time cutting into the Urban Prairie papers the first time because they're just so pretty but I think it's fun to use them rather than just let them sit on the shelf. The little flag for the sentiment was inspired by Anna Wight. She always has the cutest ideas!

Supplies:
  • Stamps - Pink Cat Studio Party Farm Animals
  • Ink - Archival Black, Distress Ink Aged Paper
  • Paper - SU Kraft, Pink Pirouette, White, Basic Grey Urban Prairie
  • Misc - Reinkers, Button

Tuesday, November 11, 2008

More Caribou Coffee Inspiration

Today I have another card using the color combo inspired by Caribou Coffee (Cool Caribbean, Kiwi Kiss, Riding Hood Red and Chocolate Chip).

It was kind of fun to make some holiday cards this past weekend since it was snowing. Thankfully it was a very light snowfall that melted by the next morning. I'm not quite ready for snow!

Back to the card, I used my cuttlebug snowflake folder on whisper white and then added some vintage photo distress ink with a sponge applicator to help make the snowflakes pop. The designer paper is from the Bella Rose SU collection. The snowflakes stamped on the blue panel and green strip are from Rubbernecker. I used chipboard for the large cuttlebug snowflake then painted it white (snowcap paint dauber) and sprinkled glitter onto the wet paint. Once the paint was dry I sponged a little vintage photo over the snowflake to give it a little more aged look. I also added a gemstone to the center of the snowflake.

Supplies:
  • Stamps - Rubbernecker
  • Ink - Cool Caribbean, Kiwi Kiss, Distress Ink Vintage Photo
  • Paper - SU Cool Caribbean, Kiwi Kiss, Bella Rose DP, Choc Chip, Very Vanilla
  • Misc - Scallop border punch, Cuttlebug (Snowflake folder, snowflake die), Vintage rick rack, Ranger Paint dauber snowcap, glitter, paper piercer, gemstone, popdots

Monday, November 10, 2008

Inspired by Caribou Coffee

I stopped at Caribou coffee the other day and was inspired by the colors on the coffee sleeve. To me the combo looked like Cool Caribbean, Kiwi Kiss, Riding Hood Red and Chocolate Chip. Here's what I came up with using that color combo except I substituted Kraft for Chocolate Chip.

The basket image from Rubbernecker is stamped in Timber Brown Stazon on Very Vanilla. The greeting from Papertrey Ink is stamped in SU Riding Hood Red. The edges are sponged with Vintage Photo Distress Ink. The image is layered on SU Cool Caribbean and Kraft. The patterned paper is from the Bella Rose pack. The bottom layers were both run through my Cuttlebug (Kiwi Kiss with the Swiss Dot folder, Cool Caribbean with the Textile folder). I also used the scallop border punch on the Kiwi Kiss layer. For the finishing touch I added some faux stitches to the image panel.

Supplies:
  • Stamps - Rubbernecker, Papertrey Ink
  • Ink - SU Riding Hood Red, Stazon Timber Brown, Distress Ink Vintage Photo
  • Paper - SU Kraft, Cool Caribbean, Kiwi Kiss, Bella Rose DP
  • Misc - Scallop border punch, Cuttlebug and folders (Swiss Dot, Textile)

Saturday, November 8, 2008

Dino-mite!

I love the retired Dino-Mite set from Stampin Up. I think it pairs very well with the Archaic line from Basic Grey. For this card I started with a base of Kraft then added a black mat. The designer papers are all from the Basic Grey Archaic 6x6 pack and two of the panels are matted with SU River Rock. The third panel is just sponged with Vintage Photo distress ink. I used a Copic multiliner to dot the edges of some of the panels. I also sponged some Peeled Paint distress ink on the bottom of the dino circle and Vintage Photo around the edges. The dino is stamped in SU Baja Breeze and mounted with pop dots. For the finishing touch I added the ribbon.

Supplies:
  • Stamp - SU Dino-Mite (retired)
  • Ink - SU Baja Breeze, Distress Inks (Vintage Photo, Peeled Paint)
  • Paper - SU Kraft, Black, River Rock, Basic Grey Archaic
  • Misc - Copic multiliner, ribbon, pop dots

Friday, November 7, 2008

Curly Label Punch


I wanted to try out my new SU Curly Label punch bundle that just arrived so I put together this simple card. The card base is SU Kraft with a mat of Very Vanilla. For the Tangerine Tango layer I ran the top portion through my Cuttlebug with the swirl folder. Next I wrapped a ribbon around the layers. I stamped the thank you frame with Tangerine Tango onto Kraft then punched it with the matching punch. For the vanilla layer I just freehanded that cut. The labels were mounted with pop dots and then a prima flower was added with an orange rhinestone center. I think I'll get a lot of use from the punch and stamp set. They would work well for putting together quick notecard sets for gifts.

Supplies:
  • Stamp - SU Cute & Curly (from the CurlyLabel Punch Bundle)
  • Ink - SU Tangerine Tango
  • Paper - SU Kraft, Very Vanilla, Tangerine Tango
  • Misc - SU Curly Label Punch, Cuttlebug and Swirl embossing folder, Ribbon, Prima, Rhinestone

Wednesday, November 5, 2008

Cakebella Pirouette

I finally ordered some of the SU in-colors inks, paper and ribbons plus the new scallop border punch. The box arrived yesterday but I didn't have a chance to play until today so here's my first card with my new stuff. I'm really liking the new colors and the scallop punch!


Supplies:

  • Stamp - Cakeabella from Stamping Bella
  • Ink - Palette Hybrid Noir, Kiwi Kiss (with aqua brush)
  • Paper - Kraft, Pink Pirouette, Kiwi Kiss, White, Basic Grey Sultry Collection
  • Misc - Scallop Border Punch, Pink Pirouette Ribbon, Copics, Aqua brush